Posts

Mitel 5000 reboot procedure

Image
Mitel main phone system reboot Middle Button once Down arrow to “System Menu” Middle button to select “System Menu” Down arrow to “Reboot” Middle button to select “Reboot” Down arrow to “Yes” Middle button to select “Yes” Reboot usually takes less than 5 minutes If you accidently power it off instead of reboot to power it back on select the middle button

Office 365 Change default save from OneDrive in Word and Excel

Image
Open Word or Excel Open a blank document Click on “File”, “Options”, “Save”, and check “Save to Computer by default” as shown below and click “OK” at the bottom of that window to save the setting: If you have an alternate location you may want to change the “Default local file location as well” such as a network my documents redirected path mapping. Now the next time you click “save as” you will notice it now goes to “This PC” rather than OneDrive:

Enabling Macs on Trend Worry Free Console 9.5

Image
Here is the article from Trend on the original process some settings are not the same such as the after installation check of the registry to make sure it installed correctly: https://success.trendmicro.com/solution/1056560 Here is the most important parts left out you need to know. The Trend Micro Worry Free for Macs console “Plug in” is a completely different console NO settings are shared between the original console and the Plug. So you will have to set up all of the settings for Mac from scratch. Install the latest Java on your Trend Micro management server before attempting to install the Plug In: Once you install Java and enable the Plug in you will download the “Trend Micro Security (for Mac)” Plug in: Once the Plug in completes the download you install the Plug in on the server. (this is not the workstation installer) After installation you manage the Macs exclusively using an alternate console by clicking on “Manage Program” under the “Preferences” and “Plug-Ins”: You will se...

Trend Micro Worry Free client systems are unresponsive after Windows 10 defender update on 5/2017 - KB890830

Since this is a Windows Defender update it cannot be easily rolled back. User experience slowness that makes the PC appear to be not working as even the simplest tasks take significant amounts of time to complete. It is like your PC is working but at 1% of its speed. The problem is that Windows Defender update severely conflicts with Trend Micro Worry Free Agents using a local management server. The Worry Free Saas product appears unaffected by the issue. Trend Micro support is aware of the problem and working on a fix to Microsoft’s update. In the meantime the temporary fix is to disable Windows Defender active scanning following the steps below. Note: You can uninstall Trend Worry Free Agent however then you are leaving your systems vulnerable. Using the server console to remove the Trend agent will not work effectively and you will have to manually remove the agent on each system which could take 30 minutes or more per system due to the performance issues. Caution: it’s the regis...

365 One Drive Business Setting up Synchronization

Image
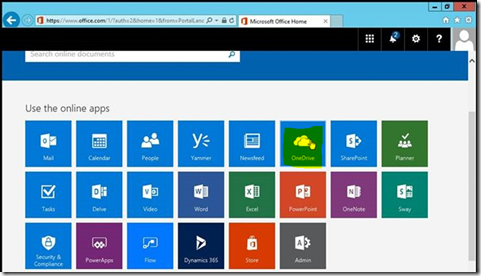
Create a separate One Drive “Cloud Administrator” account and assign a 365 license to the account. From the file server open Http://portal.office.com and log on using the Cloud Administrator account Once logged on select One Drive as shown below: Once it sets up your One Drive you can select “Your OneDrive is ready” In the OneDrive Menu select Sync as shown below: Click Allow this website to open an app: It will pop up the following “Getting Ready to sync…” if nothing happens or if you get prompted that you need an app. Then it does not have the proper version already on the system you may have to click on “Get the latest version of OneDrive as: You should then see the following to enter in your Cloud Admin account and sign in: You will get prompted with a password logon for Office 365 which will require that same account Sign in. Then you will see the following which we will redirect to the folder we want to sync by selecting “Change Location” In this case I will go to the D:\...

365 One Drive Business Share Permissions

Image
Create a separate One Drive “Cloud Administrator” account and assign a 365 license to the account and setup the One Drive Share sync. Once that is done to edit cloud permissions: From the file server open Http://portal.office.com and log on using the “Cloud Administrator” account Once logged on select One Drive as shown below: It will open your One Drive Business share: To change permissions, select the check box to the left of the file or folder as shown below: Right Click and select Details as shown below: You will notice on the right side the file details scroll down to “Sharing” as shown below: That will expand to show you the file or folder permissions from there you can add people, stop sharing to that person, or revise read/write permissions as shown below: CAUTION: These are One Drive share permissions ONLY this will not impact your share permissions internally on the file share those permissions should be modified as well. Note: I would recommend using fo...

Veeam backup fails with “Virtual Disk is not a multiple of” error

Depending on what other backup, build, or restoration solutions you have in place you may see a “virtual disk is not a multiple of…” error when backing up with Veeam. The error sounds quite ominous like a major disk issue on the host. The good news is it ends up it is a quick fix on the VM using the GUI interface. Open up the VM settings and resize the virtual drive from the weird size such as 79.435346435 GB to 80GB and the same for the secondary or other disks for example 250.45346324GB to 251GB. Then access the VM and expanded the drives via the OS. If it is already a “normal” drive size try going up another drive size for example 80GB to 81GB and expand the drive in the OS. Then test the backup job. Credit: Veeam KB article https://www.veeam.com/kb1848